Write your Work History section. Leave a gap of one line after your skills section, and head up your new work history section.
This section needs to reinforce that you have valuable skills that you've put into practice and/or developed in employment situations. It can include paid employment positions, volunteer work, and work experience or placements.
Prepare and reorganise your employment information
You made a list of all the jobs you've had back at the 'Prepare' stage, and then organised them into paid and unpaid employment at the 'Organise' stage. Now check that all the necessary information about each position is there (dates, places, etc) and fill in any gaps before you start laying this information out in your CV.
Reorganise your paid and unpaid employment information into two lists in date order, starting with the most recent and working backwards.
Plan your work history section layout
Your paid and unpaid employment should go in separate subsections within the work history section - which one goes first depends on which positions are going to be most important to the employer. For example:
- If you're a Health Sciences graduate in, say, physiotherapy or dentistry, your unpaid work should come first, because that's where you'll list the details of your 'placements'
- If you've previously had paid positions only in retail or hospitality and now want to work for a charitable organisation assisting children with terminal diseases, your volunteer work for Presbyterian Support and UNICEF should come first
- If you're graduating from surveying and want a job at a surveying firm, your summer jobs in the field are going to have a big impact, so whichever section they're in should come first
You get the idea - don't worry if you only need one section! Just leave whichever you don't need out and don't bother with subsection headings.
Perfect your layout to take advantage of the skim reading process
Bearing the layout principles in mind (Revisit 'Step 3: Format your CV'), start by creating a separate silent table for each of your previous (or current) positions in reverse chronological order.
Need a refresher about using silent tables in MS Word? Try our silent tables tutorial. (PDF, 863KB)
The easiest way to make sure all your tables and margins align is to copy and paste the tables you created for your education section in to your new work history section, then change the content.
Design your CV for your reader
Lay the details for each position out across the page in order of importance to the employer, then add in the details of the position and your responsibilities and achievements in bullet points underneath each table (make sure this text is outside the table).
For now, just include everything - we can weed things out later if necessary.
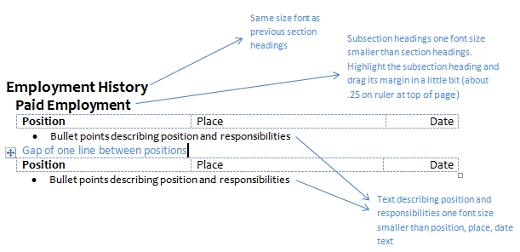
Have a look at this sample work history section for inspiration:

Once you've got all your work history details in place, start on your Interests/Activities section.
Previous – Step 6: Match your skills to the employer's needs
Next – Step 8: List your interests and activities